To start, you'll need a few inexpensive, household items. You'll be dealing with a chemical called ferric chloride, so you'll want to use personal protection such as rubber gloves and some form of eye protection. Ferric chloride is a corrosive material, which can cause burns and can be fatal if ingested. You'll need to wash it from your skin immediately with warm soapy water and soak any clothes that may come in contact with it.
- Rubber gloves
- Eye protection
- Glass or plastic container
- Cellophane tape
- Sharpie marker or nail polish
- Nail polish remover
- Steel wool
- Copper sheet
- Ferric chloride
The first thing you'll need to do is put on personal protection. The copper pieces need to be cleaned thoroughly to remove any dirt and oil before the process can begin. The process will not work well if the copper is dirty. Oil from your skin can interfere with the etching process, so you'll want to wear gloves when handling the copper to be etched. Lightly buffing the copper with steel wool will ensure the success of the etching.
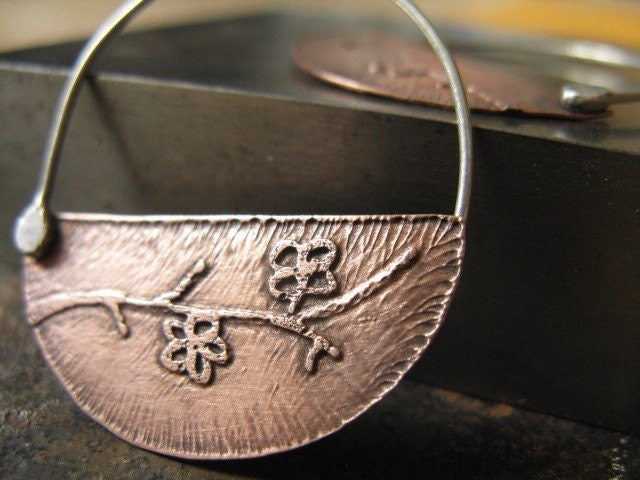
 After you've buffed the copper, use a black permanent marker or nail polish if you prefer to draw out your design. I prefer using a sharpie permanent marker over anything else because I have more control over my design and if I mess up it's as simple as buffing again with the steel wool or using a little nail polish remover to erase my mistakes. The ferric chloride will etch away the areas surrounding the drawn design, resulting in a raised relief. After you've drawn your design, turn the piece around and completely cover the backside of the copper with nail polish or permanent marker. This will ensure the backside of the piece does not get etched when placed in the ferric chloride. If the backside is not covered, your piece may be too thin when the process is complete.
 Place the copper piece into the ferric chloride just enough to cover the area to be etched and secure the extra tape to the sides of the container to suspend it. Give it a little agitation to cover the piece and let it sit for about 20 minutes agitating gently every once in a while. Lift the piece out of the solution to check it's progress. Repeat this every 20 minutes or so until you've reached the desired depth of the etching. I usually leave my pieces in around 2 hours or so to get a nice deep etching.
 Once the piece is etched as deep as you want it, remove it from the solution and wash it with soapy water. Remove the residue from the tape and the marker on the back of the piece with nail polish remover and buff with steel wool. Lightly buff with steel wool to bring the shine back to the copper and embellish your new etched piece with a patina for contrast if you prefer.
That's about it really. I hope you've found this tutorial useful. Ferric chloride is also called PCB Etchant Solution and is available from some electronic stores like RadioShack, but you will have to ask for it as they don't stock it on the shelves...Sometimes it's kept "out back" and you'll need your ID to buy it.


